
✔️ 날씨 불러오기
expo install expo-location const getWeather = async () => {
const {granted} = await Location.requestForegroundPermissionsAsync();
if (!granted) {
setOk(false);
}
const {
coords: {latitude, longitude},
} = await Location.getCurrentPositionAsync({accuracy: 5})
const location = await Location.reverseGeocodeAsync({latitude, longitude}, {useGoogleMaps: false});
console.log(location)
setCity(location[0].city)
getWeather 함수를 통해 우선 위치 공유 허용 여부를 granted 로 받고, granted 가 true 일 시에 정확도 ( accuracy 5 ) 로 위도와 경도 값을 받아온다.
이후 location 변수에 가져온 위도와 경도 값으로 위치를 받아오고 setCity 에 위치 정보를 넣는다.
// 날씨 가져오기
const response = await fetch(`https://api.openweathermap.org/data/2.5/forecast?lat=${latitude}&lon=${longitude}&appid=${API_KEY}&units=metric`);
const json = await response.json();
console.log(json);
setDays(
json.list.filter((weather) => {
if (weather.dt_txt.includes("12:00:00")) {
return weather;
}
})
);
openweathermap 으로 부터 api 를 호출해서 경도와 위도 값과 API KEY 값으로 response 에 날씨 정보를 가져온다.
해당 api 는 3시간 단위로 해당 위치의 날씨를 불러오기 때문에 12시 기준날씨 값을 setDays 에 넣어주었다.
{days.length === 0 ? (
<View style={styles.day}>
<ActivityIndicator
color="white"
size="large"
style={{marginTop: 10}}/>
</View>
) : (
만약에 위치 정보가 없다면 ActivityIndicator Component 를 활용해서 로딩이 되도록 설정을 했다.
days.map((day, index) =>
<View key={index} style={styles.day}>
<View style={{
flexDirection: "row",
alignItems: "center",
width: "80%",
justifyContent: "space-between"
}}
>
<Text style={styles.temperature}>
{parseFloat(day.main.temp_max).toFixed(1)}°
</Text>
<Fontisto style={styles.weatherIcon} name={icons[day.weather[0].main]} size={68} color="black"/>
</View>
<Text style={styles.description}>{day.weather[0].main}</Text>
<Text style={styles.tinyDescription}>{day.weather[0].description}</Text>
{/* 날짜 표시 */}
<Text style={styles.date}>{day.dt_txt.split(" ")[0]}</Text>
</View>
)
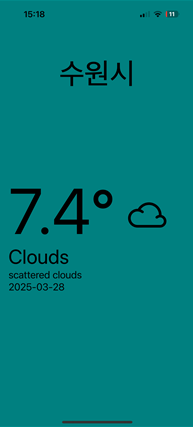
날씨 정보를 불러왔다면 반복문을 통해 day.weather[0] 에서 해당 List 로부터 날씨 정보들을 출력했다.
const icons = {
"Clouds": "cloudy",
"Clear": "day-sunny",
"Rain": "rain",
"Snow": "snow",
"Thunderstorm": "lightning"
}
아이콘 List 를 각 날씨에 맞게 만들어서 해당 Key 값이 들어올 시에 알맞는 Value 를 반환해 Expo 에서 제공하는 아이콘인 Fontisto Component 출력 양식에 맞게 출력시켰다.
Expo Icon
@expo/vector-icons directory
icons.expo.fyi
✔️ 반응형 화면 넓이 설정
const {width: SCREEN_WIDTH} = Dimensions.get("window");
width: SCREEN_WIDTH 값으로 사용자들의 모바일 환경에 맞는 넓이 값을 Dimensions 라이브러리를 활용해서 가져왔다.
day: {
width: SCREEN_WIDTH,
},
그리고 styles 에서 날씨 정보 화면 넓이를 해당 값으로 유동적으로 설정했고,
<ScrollView
pagingEnabled
horizontal
showsHorizontalScrollIndicator={false}
contentContainerStyle={styles.weather}
>
이를 가로 스크롤에서 pagingEnabled 로 설정해서 수평으로 드래그 해서 각 각 알맞는 넓이로 보이게끔 설정해주었다.
✔️ 전체 코드
import React, {useEffect, useState} from "react";
import * as Location from 'expo-location';
import {ActivityIndicator, Dimensions, ScrollView, StyleSheet, Text, View} from 'react-native';
import {StatusBar} from "expo-status-bar";
import Fontisto from '@expo/vector-icons/Fontisto';
const {width: SCREEN_WIDTH} = Dimensions.get("window");
const API_KEY = "3d8246cb64d6e5756b0021d313b6881f";
const icons = {
"Clouds": "cloudy",
"Clear": "day-sunny",
"Rain": "rain",
"Snow": "snow",
"Thunderstorm": "lightning"
}
export default function App() {
const [city, setCity] = useState("Loading...")
const [days, setDays] = useState([])
const [ok, setOk] = useState(true);
    const getWeather = async () => {
        const {granted} = await Location.requestForegroundPermissionsAsync();
        if (!granted) {
            setOk(false);
        }

        const {
            coords: {latitude, longitude},
        } = await Location.getCurrentPositionAsync({accuracy: 5})

        const location = await Location.reverseGeocodeAsync({latitude, longitude}, {useGoogleMaps: false});
        console.log(location)
        setCity(location[0].city)
// 날씨 가져오기
const response = await fetch(`https://api.openweathermap.org/data/2.5/forecast?lat=${latitude}&lon=${longitude}&appid=${API_KEY}&units=metric`);
const json = await response.json();
console.log(json);

setDays(
    json.list.filter((weather) => {
        if (weather.dt_txt.includes("12:00:00")) {
            return weather;
        }
    })
);
};
useEffect(() => {
getWeather();
}, []);
return (
<View style={styles.container}>
<View style={styles.city}>
<Text style={styles.cityName}>{city}</Text>
</View>
<ScrollView
pagingEnabled
horizontal
showsHorizontalScrollIndicator={false}
contentContainerStyle={styles.weather}
>
{days.length === 0 ? (
    <View style={styles.day}>
        <ActivityIndicator
            color="white"
            size="large"
            style={{marginTop: 10}}/>
    </View>
) : (
days.map((day, index) =>
    <View key={index} style={styles.day}>
        <View style={{
            flexDirection: "row",
            alignItems: "center",
            width: "80%",
            justifyContent: "space-between"
        }}
        >
            <Text style={styles.temperature}>
                {parseFloat(day.main.temp_max).toFixed(1)}°
            </Text>
            <Fontisto style={styles.weatherIcon} name={icons[day.weather[0].main]} size={68} color="black"/>
        </View>
        <Text style={styles.description}>{day.weather[0].main}</Text>
        <Text style={styles.tinyDescription}>{day.weather[0].description}</Text>
        {/* 날짜 표시 */}
        <Text style={styles.date}>{day.dt_txt.split(" ")[0]}</Text>
    </View>
)
)}
</ScrollView>
<StatusBar style="dark"></StatusBar>
</View>
);
}
const styles = StyleSheet.create({
container: {
flex: 1,
backgroundColor: "teal"
},
city: {
flex: 1.1,
justifyContent: "center",
alignItems: "center"
},
cityName: {
fontSize: 58,
fontWeight: "500"
},
weather: {
marginLeft: 20
},
day: {
    width: SCREEN_WIDTH,
},
temperature: {
marginTop: 50,
fontSize: 128,
},
description: {
marginTop: -10,
fontSize: 40,
},
tinyDescription: {
fontSize: 20,
},
date: {
fontSize: 20,
},
weatherIcon: {
marginTop: 80
}
});'컴퓨터 프로그래밍 > React Native' 카테고리의 다른 글
| [React Native] Todo 어플리케이션 (0) | 2025.03.30 |
|---|---|
| [React Native] React Native 공식문서 및 Expo SDK, Layout, Component (0) | 2025.03.27 |
| [React Native] 개념 및 작동원리, 환경세팅 (0) | 2025.03.26 |